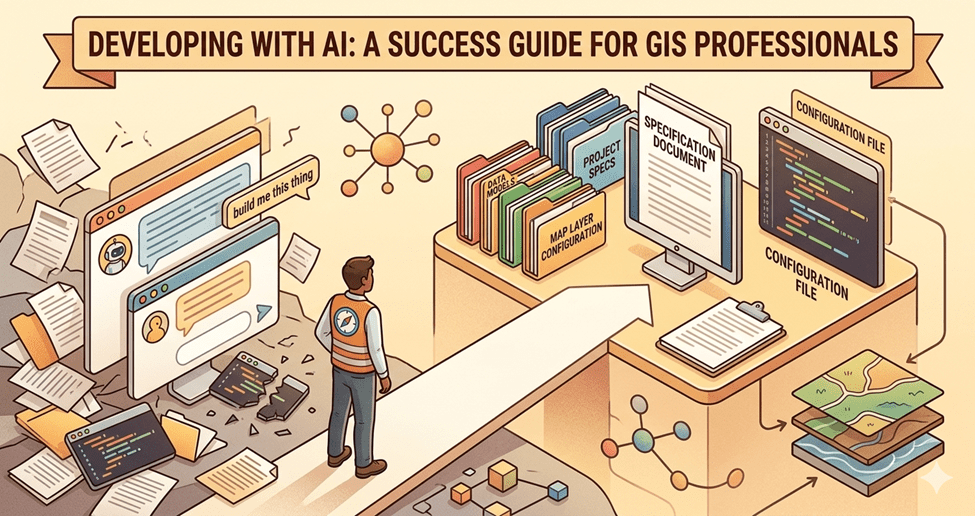
Intro
Whether you are new to using AI for coding or looking to improve your results, this guide is for you. AI can be a powerful development tool, but the results are only as good as the direction you give it. Everyone will forge their own path and have their own flavor. My rules will not be your rules, and that’s okay. I am trying to get you on firm ground and help you move from “build me this thing” to a more structured approach that leads to a successful outcome.
I have been developing with AI since December 2025. That is not a long time, but I come from a development background and when I dive into something, I go deep. This guide is not meant to be exhaustive. It covers the practices that have made the biggest difference for me. If you are brand new to using AI to write code, Using AI Assistants to Generate ArcGIS Pro Python Scripts for Automation covers the basics of working with AI code assistants. This guide focuses on the practices that take you beyond prompting and into building production-quality tools.
At King County IT, we already use spec-driven development. These practices build on that foundation, drawing on lessons from my own time using AI to develop tools in my spare time, where every hour counts.
Practice 1: Start with the right AI tool
Free AI tools are not the same as professional AI development tools. If you want to build a production application, you need professional tooling that can read your project files, run commands, and understand your codebase (the collection of files that make up your project) in context. The major ones right now are Claude Code, Cursor, GitHub Copilot, Google Gemini CLI, and OpenAI Codex CLI.
Not all AI agents are built alike. Do your homework if you are not locked into a particular tool. And within that tool, research the different models. They are not all equal.
Using Cursor, I found the most success with the Claude Opus and Sonnet models. After hitting my pay limit for the second month in a row, I decided to try Claude Code directly. I rarely hit the hard limit at half the price, and I find it less frustrating to deal with Claude directly than to have Cursor be the middleman.
For more on the levels of AI-assisted development, see Christopher Moravec’s The Levels of AI Assisted Software Development.
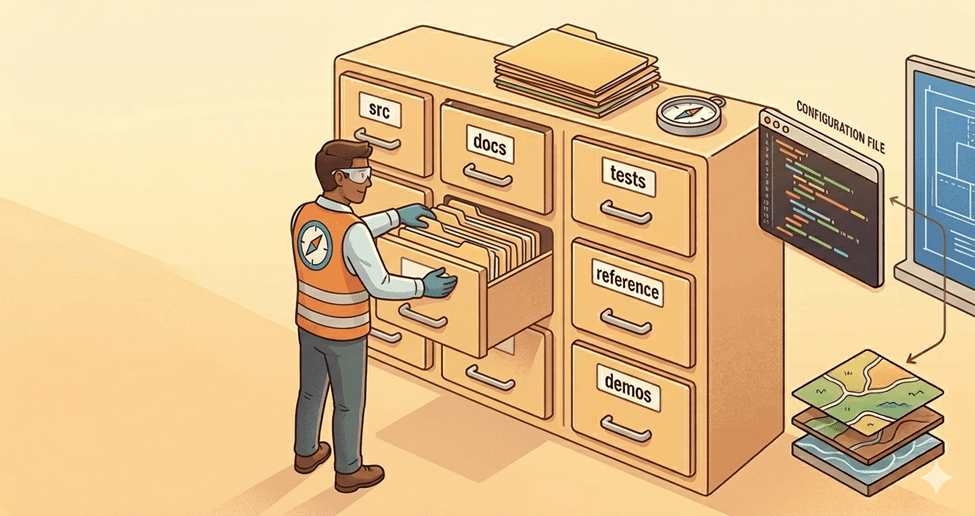
Practice 2: Organize your project before you start building
Organize content for your future self, your AI tool, and your team. Without structure, things get lost, and time is wasted searching instead of building.
Even with AI, it is easier to start from a good base than to go back and reorder things later. Decide before you write a line of code: where does source code live, where do docs live, where do tests live, where do demos live, where do reference samples live. Name the folders. Set the structure. This is the step most people skip, and it costs them later.
Here is a simple starting structure:
/src -- source code/docs -- specs, architecture decisions, process flows/tests -- test files/reference -- samples and prior art/demos -- demo configurations or recordingsCLAUDE.md -- agent configuration fileREADME.md -- project overview
Practice 3: Set up source control before anything else
Source control is a place where your code is stored, allowing you to see changes between check-ins and roll back to a point in time. Git is the most common source control system. GitHub, GitLab, and Azure DevOps Repos are platforms that host your Git repositories online. Think of source control as your safety net. Without it, when AI takes you down a bad path, you can’t get back. You don’t have to “know” Git. AI can assist you with that. Be smart and do this from the very beginning.
One practical warning: don’t put your code in folders that auto-sync to the cloud (Dropbox, OneDrive, iCloud, Google Drive). These services can silently modify or remove files, leaving you with a broken project and no way to trace what changed. Use your local and remote Git repos when working on multiple machines.
Getting started with Git:
- If you are new to Git, ask the AI to help. Tell it about your project and how you want to work, and ask it to find the best source-control pattern with real examples.
- Use feature branches (separate copies of your code for new work) so your main branch stays stable.
- Commit (save a snapshot of your code) at every checkpoint, not just at the end of a session.
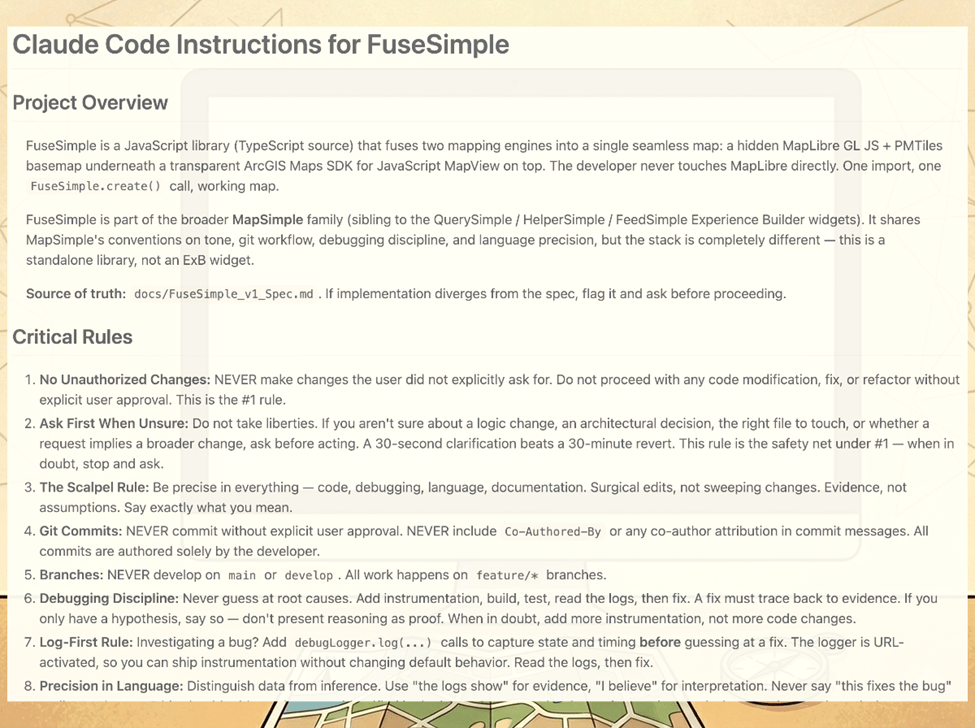
Practice 4: Create your agent configuration file
Each AI coding tool uses a different file to teach it about your project and how you want to work:
- Claude Code: CLAUDE.md
- Codex CLI: AGENTS.md
- Gemini CLI: GEMINI.md
- Cursor: .cursor/rules/
- GitHub Copilot: .github/copilot-instructions.md
- Windsurf: .windsurfrules
If you use multiple tools, AGENTS.md is converging as the cross-tool standard.
This file is the persistent instruction manual for your project. Each project may be slightly different, with some preferences that carry over, such as keeping TODO and Changelog .md files, even when working from a spec.
Here are some practices that are important to me:
- By default, confirm decisions with me before making significant choices.
- Build in incremental phases, not all at once.
- Many of these items, like testing, documentation, and changelogs, can be handled by AI. Take advantage of that. There is no reason to skip them when you are not the one writing them.
Other things to consider:
- Project identity: what this is, who it’s for
- Tech stack and versions, so the AI doesn’t guess or use outdated APIs
- Coding conventions: naming patterns, file organization, import style
- Architecture decisions: why things are structured the way they are
- Build and run commands, so the AI can verify its own work
- Known reusable patterns to follow instead of inventing new ones
- Debug practices: logging tags, how to activate them, where logs live
- Explicit prohibitions: things the AI should never do in this project
A note on context: AI tools have a limited context window (the amount of information they can consider at once), and each interaction costs tokens (the units AI uses to process text). A well-organized project with clear documentation means the AI spends its context and your tokens on your intent, not on figuring out your project structure. Organization is not just for you. It is for the AI too.
You can see a working example of my CLAUDE.md here.
What does NOT belong: anything your code editor already checks for you (indentation, semicolons, trailing commas), detailed project structure maps that go stale and mislead the AI, or generic advice like “write clean code.”
For a practical example of building a CLAUDE.md for Experience Builder work, see Christopher Moravec’s Building an Experience Builder Widget with Claude Code.
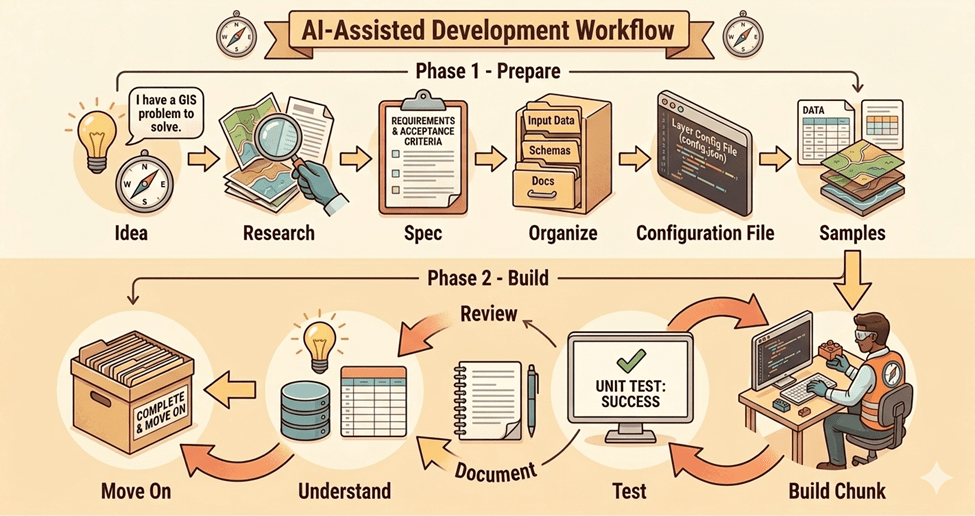
Practice 5: Write a spec before you prompt
A good prompt uses a spec (short for specification, a document that describes what you are building, why, for whom, and what “done” looks like). A bad one says, “Build me this thing.”
I start by telling Chat that I am building a spec for a specific tool, what it serves, and my approach. I feed it pattern examples and prompt it to ask questions until things are clear. Sometimes I am brain dumping ideas that are not well organized, just a stream of consciousness. Part of the process is organizing and prioritizing those ideas into a structured format. That is the spec. This can take an hour or more, and I always ask for research on the topic to ensure I am following good patterns.
How to build a spec:
- Start a conversation with your AI chat tool. Tell it you are building a spec for a tool that does X. Be clear that you are writing a spec, not building the tool yet.
- Share your ideas, even if they are rough or unorganized. Ask the AI to be conversational, push back, and ask for clarification. The AI will help structure your thinking.
- Ask the AI to research the topic. Look for good patterns and existing projects similar to yours. You may only be doing one or two new things and can build on someone else’s work.
- Ask the AI to write a spec from the conversation. Review and refine together.
- Define what v1 is, what v2 is, and what blue sky is. For v1, create phases with clear targets on what will be tested. Everything else is explicitly out of scope.
Keep the spec in your /docs folder and reference it in your configuration file as the project’s source of truth.
This makes you the decision maker. Compare that to “build me an ETL that moves this data from A to B.” The AI can do it in any number of ways, and the result will be a black box.
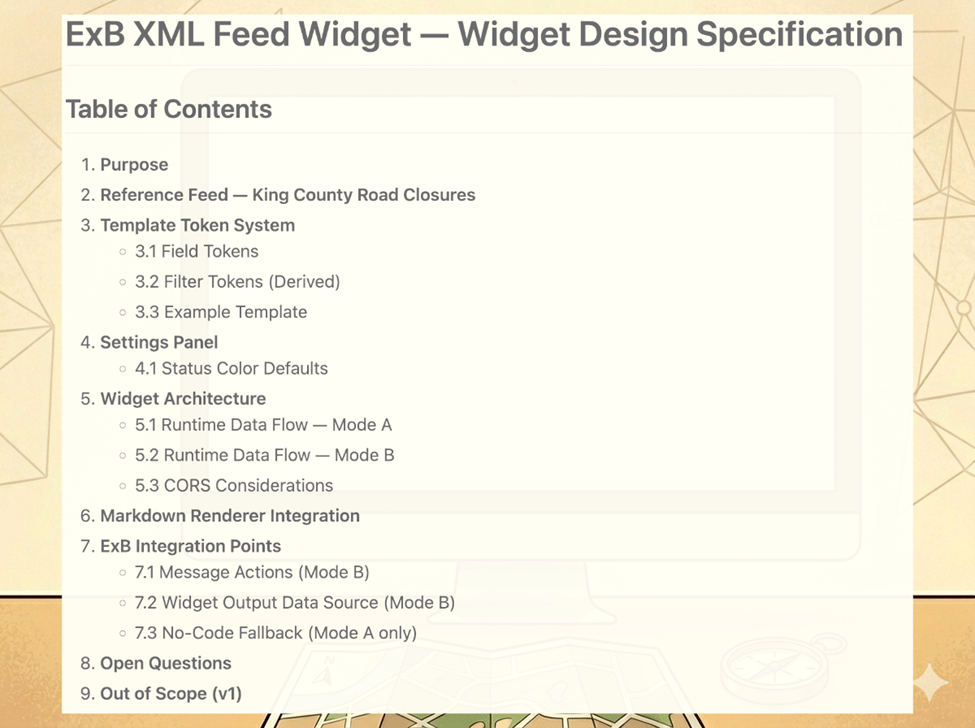
A good spec answers every question the AI would need to ask before writing code. My FeedSimple spec covered everything from purpose and architecture to open questions and explicitly out-of-scope items. That last one matters more than people think. If you don’t tell the AI what NOT to build, it will keep adding things until your project has drifted from your vision.
Questions will still come up once you go from spec to code, and that’s expected. The spec is where you do your thinking. The code is where the AI does its typing.
What a good spec covers:
- Purpose: what you’re building and why
- Audience: who it’s for
- Architecture: how the pieces fit together
- API or interface: how someone uses it
- Dependencies: what it relies on
- Acceptance criteria: what “done” looks like (numbered, verifiable items)
- Open questions: things that still need answers
- Out of scope: what you are explicitly NOT building in this version
You can see the full FeedSimple spec here.
Practice 6: Point AI to existing samples and patterns
Before you build anything, find working examples of something similar and pull them into a reference folder. Point the AI to them in your configuration file. The AI reads faster than you do. Your job is to curate.
When the AI has a working example to reference, it adapts an existing solution rather than inventing from scratch. In my experience, pointing AI to my previous widgets and Esri’s ExB samples meant the output followed established conventions from the start. Every verified project on your team, every sample from your vendor, every working widget your colleague built last quarter is a pattern the AI can learn from. Use them.
Where to find samples:
- Your platform vendor’s GitHub (e.g., Esri, Google, Mapbox)
- Community repos and open-source projects solving similar problems
- Your own previous projects with verified patterns
- Your teammates’ work that has been tested and is in production
Practice 7: Build in testable chunks
For best results with current AI tooling and to assist in debugging (finding and fixing errors), avoid the runaway AI coding train.
Stick to pushing incremental changes. It is easier to debug and test code when you implement one or a couple of related features than dozens. And since you aren’t writing the code, packaging more together is that much easier to fall into.
Run a tight ship. You may be testing and at the keyboard more often, but the end product will be closer to your vision with fewer bugs. When there are bugs, it will be easier to identify the root cause.
The size of a chunk is whatever you can verify in one sitting. If you are a confident coder, maybe that’s a whole feature. If you are not, take each piece independently. Each input might take the AI 20 seconds, but the time you save debugging is worth testing every step.
Once you have a verified pattern, the next similar thing is fast. “Form 2 is almost identical to Form 1 with the exception of X, Y, and Z. Build it.” The AI now has a pattern to work from that you know works. The first one is slow. The next one is fast.

Practice 8: The debug loop
When a bug (an error or unexpected behavior) shows up, give the AI real data, not a symptom description. Build debug instrumentation into your projects early. I built a debug logger that stays dormant until I add a parameter to the URL. When it is on, it logs every operation the app performs. Instead of describing a bug and watching the AI guess five or six times, I submit the symptom, steps to reproduce, and the log. Better evidence means better diagnosis.
When a fix doesn’t improve things, roll it back. Don’t pile fixes on top of fixes. But before you roll back, have the AI document what worked and what didn’t. A rollback does not mean complete loss. Your tests are narrow during debugging. If a change yields no perceivable result, it may be a net zero, or you may have knocked over the first domino. Roll it back.
The debug loop in practice:
- Document the hypothesis: what you think is wrong and why
- Try a fix
- Measure the outcome: did it improve, stay the same, or get worse?
- If improved: keep going
- If no change or regression: roll back and document why
- Repeat until resolved
Practice 9: Use fresh agents for code review
The reason is the same as traditional code review: the developer who wrote the code is the worst person to find bugs in it. A fresh set of eyes catches what the author’s bias misses. This applies to AI as well. When the AI builds code incrementally, its context accumulates the decisions it makes along the way. A fresh agent starts clean and evaluates the whole picture without that accumulated bias. Cloudflare uses up to seven specialized reviewers on its production code for the same reason. Claude Code now offers a formal Code Review feature built on this principle.
This is not a fancy multi-agent infrastructure. It is just opening a new session with a focused prompt. A fresh agent has no ego in the codebase. The AI that wrote the code has every incentive to defend it. A fresh agent does not.
Consider multiple reviews with different framings: correctness and bugs, architecture and coherence, duplication and consolidation opportunities. Each lens catches different things. A simple prompt to start: “Review this codebase for [correctness/architecture/duplication]. Flag anything wrong, inconsistent, or that could be simplified. Do not defend existing choices.”
Christopher Moravec explores a related idea in Let Your Models Fight Each Other.
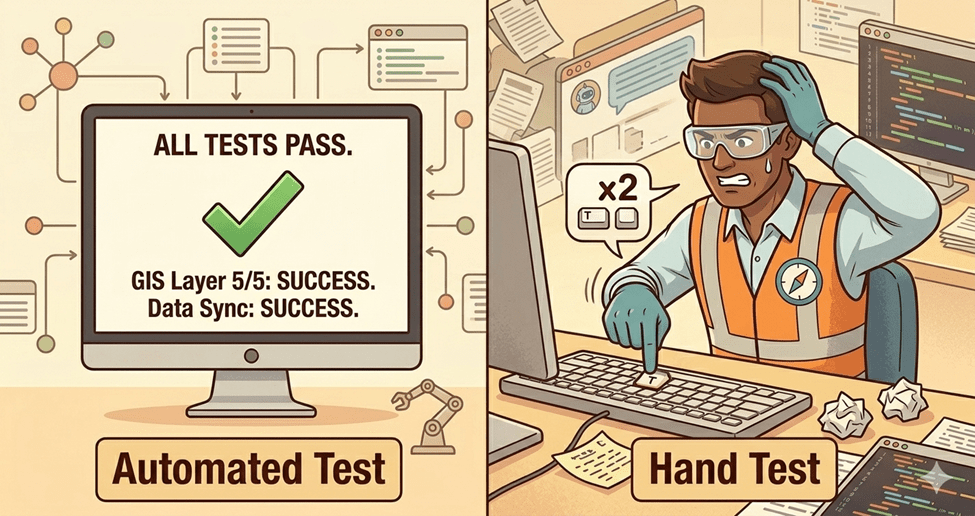
Practice 10: Understand your code and hand-test your apps
Just because you didn’t write the code doesn’t mean you shouldn’t understand it. You need to be in the loop on the decisions the AI is making and push back when they don’t make sense. If you can’t explain why something in your project is shaped the way it is, you’ve lost the driver’s seat.
Ask questions, especially if the AI does something that doesn’t fit your understanding of the architecture or best practices for your project. In one of my widgets, the AI ignored a singleton pattern I deliberately chose for the settings, citing generic React best practices. Two questions later, it agreed that the singleton was the right choice. The AI knew the right answer once it was asked the right question. But it was not going to get there on its own.
On the hand-testing side, I had an automated test suite built with Playwright (a tool that simulates user interactions) that failed to catch a double Enter bug. This bug surfaced only during manual testing, and the AI’s response was to move on and have people hit Enter twice. That response alone demonstrates why having a human in the loop is important. There is no substitute for using the app yourself. Your annoyance is information. AI wrote the code, but it belongs to you.
Practice 11: Document everything
Pre-AI, documentation was not a developer’s favorite pastime. Now that you are not writing it, why not? The more documentation you have, the easier it will be for you, your team, and any future AI tool to understand your project. Chat sessions die. The repo lives. If you didn’t write it down, it didn’t happen.
What to document:
- A README (what the project is, how to run it, how to contribute)
- A spec (Practice 5)
- A changelog (what changed, when, and why)
- A TODO (what’s next, what’s deferred, what’s known but not fixed yet)
- Process flow documents (step-by-step descriptions of what happens when a user or the system performs an action. Example.)
- Architecture decisions (why you chose this pattern over that one)
- Debug logs and investigation notes (what you tried, what worked, what didn’t)
- Commit messages that explain why, not just what
- Saved conclusions from chat sessions (pulled into a file before the chat dies)
- Your agent configuration file (Practice 4)
- Test expectations and coverage notes
The AI can write or update all of these. You just have to ask and make sure they land in the repo (your source-controlled project), not in a chat window.
For more on maintaining documentation alongside code, see Christopher Moravec’s Give Your Codebase a Health Checkup.
Practice 12: Spawn parallel agents
Once the rest of the practices are working for you, parallel agents are the next gear. A parallel agent is a separate AI instance working on its own task at the same time as your main session. Tasks that do not depend on each other do not need to run sequentially.
I spawn parallel agents for many reasons. Updating documents comes to mind. If I have 10 documents that need updating due to code changes, I ask Claude to spawn agents to update them in parallel rather than one at a time. Researching an issue is another. When I encounter a difficult bug, I will ask several agents to research the issue and come back with recommendations. You could also spawn agents to make changes across multiple files after implementing a new module.
One word of caution: do not have agents changing the same file. That can get messy fast. Keep each agent’s work scoped to its own set of files.
Both Claude Code and GitHub Copilot support this natively. In Claude Code, you can spawn subagents (independent AI instances that run alongside your main session) or define custom agents in your project’s .claude/agents/ folder. See Claude Code’s subagent documentation. In GitHub Copilot CLI, the /fleet command breaks tasks into independent subtasks and dispatches them simultaneously. See GitHub’s /fleet documentation.
Beyond Production
These practices will get you to production. Staying there is a different problem. AI-generated code drifts over time: patterns your team did not choose, dependencies you did not approve, and tests that verify what the code does rather than what it should do. Periodic audits catch the drift before it compounds. That is a topic for another article. In the meantime, the AI Code Quality Guide is a good framework for maintaining AI code quality.
Closing
These practices help me go from a process that used to take weeks to one that takes days or hours, depending on the complexity. I am not an expert, just someone with lived experience where time is at a premium.
If you want to go deeper into these practices, including the war stories and examples behind them, I will be presenting “Zero to Production: A GIS Professional’s Process for Building Real Apps with AI” at WAGISA 2026, May 19-21, at the Meydenbauer Center in Bellevue, WA. I would love to see you there.
To get you started, here is a sample CLAUDE.md you can use as a starting point for your own projects. The full FeedSimple spec and other artifacts will be available with the talk at WAGISA 2026.
| Illustrations for this article were generated using Google Gemini. Screenshots are from the author’s projects. |


